11. 관리자 페이지 구성하기 ver.1

데이터베이스를 굳이 보지 않고도 데이터를 찾아보자
채점자 페이지에서 가장 중요한 것은 채점된 데이터를 보기 좋게 출력해 주는 것이 아닐까.
어떻게 보면 관리자 페이지로 볼 수도 있으니, 다양한 기능이 추가되면 정말 편하겠지만
가장 먼저 DB와 연동해 데이터 테이블을 구성하기로 했다.
Table 컴포넌트 사용하기
하지만 단순히 데이터만 보여주는 테이블만으로 만족할 수는 없다.
Material-UI에서 제공하는 Table을 약간 커스터마이징하여 스타일을 주도록 하자.
// file: 'SectionTable.js'

import { TableContainer,
    Table,
    TableRow,
    TableBody,
    TableCell,
    Paper,
    TableHead,
    TablePagination,
    makeStyles,
    withStyles } from "@material-ui/core";
import { useState } from "react";

...

const StyledTableRow = withStyles((theme) => ({
    root: {
      '&:nth-of-type(odd)': {
        backgroundColor: theme.palette.action.hover,
      },
    },
}))(TableRow);


const StyledTableCell = withStyles((theme) => ({
    head: {
      backgroundColor: '#00234B',
      color: theme.palette.common.white,
      fontSize: theme.typography.subtitle1,
    },
}))(TableCell);

...
각각 TableRow, TableCell 컴포넌트의 스타일을 재정의하여 새로운 컴포넌트 StyledTableRow, StyledTableCell을 만들었다.
StyledTableRow는 홀수 행마다 밝은 회색으로 칠한 것이고, (구분하기 쉽다😆)
StyledTableCell은 대표 셀들에 색을 칠한 것이다.
다음은 데이터를 받아오자.
SectionTable 컴포넌트는 테이블을 리턴하는 컴포넌트이므로, 이를 child로 부르는 상위 컴포넌트에서
백엔드로 값을 요청해야 한다.
그리고 그 컴포넌트는 SectionClassForInst 되시겠다.
채점자 페이지 구성
채점자 페이지로 진입하려면 역시 토큰이 필요하다.
그리고 그 토큰은 채점 기준 시 같이 생성되는 관리자용 6자리 토큰이어야 한다.
// file: 'SectionClassForInst.tsx'

function ClassForInst (props: RouteComponentProps<RouteParamsProps>) {
    const classesStyle = useStyles();
    const classesLayout = useStylesLayout();

    const initial = {
        itoken: "",
        className: "",
        instructor: "",
        createDate: "",
    };


    const [classroom, setClassroom] = useState(initial);


    useEffect(() => {
        if (classroom === initial) {
            const currentClassroomState = async (): Promise<ClassroomInstProps[]> => {
                return await axios.get<ClassroomInstProps[]>('/api/token/')
                .then((response) => {
                    return response.data
                });
            };


            currentClassroomState()
            .then(response => {
                setClassroom(response.find(element => element.itoken === props.match.params.token) || initial);
                if (response.find(element => element.itoken === props.match.params.token) === undefined) {
                    props.history.push('/');
                    alert("클래스가 없습니다.😅");
                }

            })
        }
    // eslint-disable-next-line react-hooks/exhaustive-deps
    },[classroom]);


   ...
일단 채점자 페이지는 단순히 구성해 놓는다.
백엔드에서 현재 열린 모든 토큰을 받아와, 받은 토큰이 여기 있는지 확인하고
없다면 홈으로 리다이렉트, 있다면 return 문 아래의 컴포넌트를 출력한다.

즉, 채점자 페이지에 진입하기 전에 여기에 6자리 토큰을 입력해 페이지 컴포넌트에게 전달하고,
페이지 컴포넌트는 백엔드에 토큰 리스트를 요청해 존재 여부를 판별한다.
🔥 만약 토큰이 굉장히 많아지면, 리스트를 받아와 검사하는 과정 자체가 느려지지 않을까?
백엔드에 토큰을 보내고, 백엔드에서 존재 여부를 확인하면 더 빠를까?🤔
백엔드에 요청할 것은 하나 더 있다!
바로 테이블에 넣을 데이터.
하지만 백엔드가 넘겨주는 데이터는 보여줄 필요가 없는 부분도 있고, 채점 기준이 아닌 것은 null로 전달되었기 때문에,
이를 적절히 처리해주어야 했다.
먼저 테이블에 들어갈 데이터 타입을 위해 인터페이스를 선언해 주자.
// file: 'index.d.ts'

...

export interface GradingResultProps {
    isDirect: string,
    studentNum: string,
    result: number,
    point: number,
    count: {
        deductedPoint: number,
    } | undefined,
    compile: {
        deductedPoint: number,
    } | undefined,
    runtimeCompare: {
        deductedPoint: number,
    } | undefined,
    classes: {
        deductedPoint: number,
    } | undefined,
    packages: {
        deductedPoint: number,
    } | undefined,
    customException: {
        deductedPoint: number,
    } | undefined,
    customStructure: {
        deductedPoint: number,
    } | undefined,
    inheritInterface: {
        deductedPoint: number,
    } | undefined,
    inheritSuper: {
        deductedPoint: number,
    } | undefined,
    overriding: {
        deductedPoint: number,
    } | undefined,
    overloading: {
        deductedPoint: number,
    } | undefined,
    thread: {
        deductedPoint: number,
    } | undefined,
    javadoc: {
        deductedPoint: number,
    } | undefined,
    encapsulation: {
        deductedPoint: number,
    } | undefined,
}
이전에 언급했듯이, 백엔드에서 넘어온 채점 기준이 null일 수도 있다.
따라서 내가 관심 있는 감점 점수만 받아오고, undefined일 수도 있음을 명시했다.
// file: 'SectionClassForInst.tsx'

  ...

    const [classroom, setClassroom] = useState(initial);
    const [load, setLoad] = useState(false);                       // NEW !!
    const [dataGroup, setDataGroup] = useState<Object[]>( [] );    // NEW !!
    const [keyGroup, setKeyGroup] = useState<Object[]>( [] );      // NEW !!

    // NEW !!
    const handleLoad = () => {
        setLoad(true);
    }

    // 필요 없는 키 값은 과감하게 삭제하자
    function clean (obj: Object[]) {
        for (var keys in obj) {
            if (keys === 'id' || keys === 'isDirect' || keys === 'token')
                delete obj[keys];

            if (obj[keys] === null || obj[keys] === undefined) {
                delete obj[keys];
            }
        }

        return obj;
    }

    useEffect(() => {
        if (classroom === initial) {
            const currentClassroomState = async (): Promise<ClassroomInstProps[]> => {
                return await axios.get<ClassroomInstProps[]>('/api/token/')
                .then((response) => {
                    return response.data
                });
            };


            // 데이터를 백엔드에서 다시 GET!
            const getGradingData = async () => {
                return await axios.get('/api/grade/', {
                    params: {
                        itoken: props.match.params.token
                    },
                }).then((response) => {
                    return response.data;
                });
            }

            currentClassroomState()
            .then(response => {
                setClassroom(response.find(element => element.itoken === props.match.params.token) || initial);
                if (response.find(element => element.itoken === props.match.params.token) === undefined) {
                    props.history.push('/');
                    alert("클래스가 없습니다.😅");
                }

                getGradingData()
                .then((response) => {
                    var i = 0;
                    for (; i < response.length; i++) {
                        const element = clean(response[i]);

                        if (i === 0) {
                            setKeyGroup(Object.keys(element));
                        }

                        setDataGroup(old => [ ...old, element]);
                    }

                    handleLoad();
                })
            })
        }
    // eslint-disable-next-line react-hooks/exhaustive-deps
    },[classroom, load]);

    ...
추가한 것이 좀 많다. 차례대로 살펴보자.
keyGroup과 dataGroup은 백엔드에서 받을 데이터로,
관심 없는 데이터는 삭제하고 테이블 컴포넌트로 넘겨줘야 한다.
clean 함수는 🔥 이렇게 구성하기까지 굉장히 어려웠는데, Object.keys() 함수를 사용하면 null 때문에 계속 오류가 나더라…
구성해놓고 보니 간단하다. 매개변수는 객체 배열로, 채점 기준이 될 것이고
이 채점 기준의 키 값을 뽑아 필요 없는 것과 null, undefined인 것을 제거하는 로직이다.
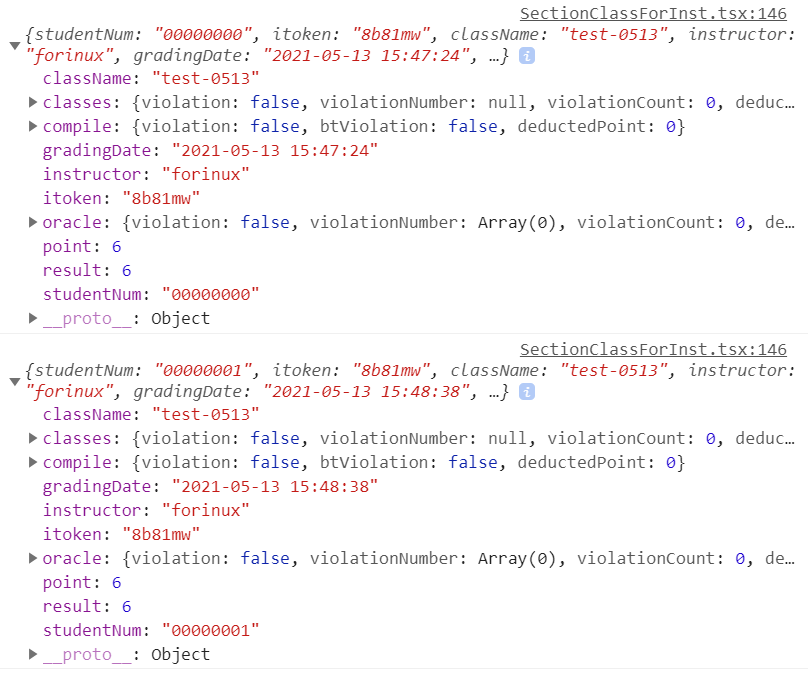
다음, getGradingData() 함수를 호출한다.
GET 함수로 백엔드에서 데이터를 요청하고, 반복문을 실행해 clean함수로 깨끗하게 만들어 준 다음,
key 그룹을 한 번만 (i == 0일 때만) 업데이트 해주고,
학생들의 데이터를 계속 추가해준다.
여기서 response는 모든 학생들의 채점 기록으로, 반복문을 돌리는 이유다.
 필요한 것만 골라냈다✌
데이터가 다 정제되면, load를 업데이트시켜 SectionTable 컴포넌트에 전달할 준비를 한다.
// file: 'SectionClassForInst.tsx'

  ...

  return (
        <>
            <AppBar position="fixed" style= >
                <Toolbar className={classesStyle.toolbar}>
                    <Link
                        variant="h3"
                        underline="none"
                        color="inherit"
                        className={classesStyle.title}
                        href="/"
                    >
                        <img src="/assets/logo.png" alt="logo" className={classesStyle.logo} />
                    </Link>
                </Toolbar>
            </AppBar>
            <SectionLayout backgroundClassName={classesStyle.background} classes={classesLayout}>
                <img style= src={backgroundImage} alt="prioirty" />
                <Typographic color="inherit" align="center" variant="h2" marked="center" className={classesStyle.h2}>
                    {classroom.className}
                </Typographic>

                {load && <SectionTable pre={keyGroup} values={dataGroup} />}  // 이 부분!!

                <Typographic color="inherit" align="center" variant="h5" className={classesStyle.h5}>
                    opened by <b>{classroom.instructor}</b> on {classroom.createDate}
                </Typographic>

            </SectionLayout>
            <AppFooter />
        </>

    );
}
SectionTable 컴포넌트의 (관심 있는) 키셋과 데이터들을 객체 배열 타입으로 전달한다.
이제 데이터도 준비되었으니, 테이블을 보기 좋게 요리하자.
// file: 'SectionTable.js'

export default function SectionTable(props) {
    const classes = useStyle();
    const [page, setPage] = useState(0);
    const [rowsPerPage, setRowsPerPage] = useState(5);

    const { pre, values } = props;
    const keys = pre.filter(
        item => item !== 'studentNum' && item !== 'point' && item !== 'result'
        && item !== 'gradingDate' && item !== 'itoken' && item !== 'instructor' && item !== 'className');


    const handleChangePage = (event, newPage) => {
        setPage(newPage);
    };

    const handleChangeRowsPerPage = (event) => {
        setRowsPerPage(parseInt(event.target.value));
        setPage(0);
    };

    const emptyRows = rowsPerPage - Math.min(rowsPerPage, values.length - page * rowsPerPage);

    return (
        <Paper className={classes.root}>
            <TableContainer component={Paper} className={classes.container}>
                <Table stickyHeader>
                    <TableHead>
                        <TableRow>
                            <StyledTableCell key="stn" align="right">
                                Student Number
                            </StyledTableCell>
                            <StyledTableCell key="total" align="right">
                                Total Score
                            </StyledTableCell>
                            <StyledTableCell key="res" align="right">
                                Student Score
                            </StyledTableCell>
                            <StyledTableCell key="time" align="right">
                                Grading Timestamp
                            </StyledTableCell>
                            <StyledTableCell key="cname" align="right">
                                Class name
                            </StyledTableCell>
                            {keys.map((row, index) => (
                                <StyledTableCell key={index} align="right">{row}</StyledTableCell>
                            ))}
                        </TableRow>
                    </TableHead>
                    <TableBody>
                        {values.slice(page * rowsPerPage, page * rowsPerPage + rowsPerPage)
                        .map((row, index) => (
                            <StyledTableRow key={index + `v`}>
                                <TableCell key={index + `stn`} align="right">
                                    {row['studentNum']}
                                </TableCell>
                                <TableCell key={index + `total`} align="right">
                                    {row.point}
                                </TableCell>
                                <TableCell key={index + `res`} align="right">
                                    {row.result}
                                </TableCell>
                                <TableCell key={index + `time`} align="right">
                                    {row.gradingDate}
                                </TableCell>
                                <TableCell key={index + `cname`} align="right">
                                    {row.className}
                                </TableCell>
                                {keys.map((detail, idx) => (
                                    <TableCell key={idx + 'each'} align="right">
                                        {row[detail].deductedPoint}
                                    </TableCell>
                                ))}

                            </StyledTableRow>
                        ))}
                        {emptyRows > 0 && (
                            <TableRow style=>
                                <TableCell colSpan={6} />
                            </TableRow>
                        )}

                    </TableBody>
                </Table>
            </TableContainer>
            <TablePagination
                rowsPerPageOptions={[5, 10, 15]}
                component="div"
                count={values.length}
                rowsPerPage={rowsPerPage}
                page={page}
                onChangePage={handleChangePage}
                onChangeRowsPerPage={handleChangeRowsPerPage}
            />
        </Paper>
    );
}
받아온 키셋 중 학번, 점수 등은 이름을 재정의해주기 위해 필터링했다. (데이터는 그대로 있다)
데이터에 따라 밑도 끝도 없이 테이블이 길어지는 것을 막기 위해 테이블의 페이지를 구성했고,
이는 TablePagination 컴포넌트로 해결할 수 있다.
TableHead에는 해당 데이터가 무엇인지 명시하는 헤더를 구성하고,
TableBody에는 그에 맞게 데이터가 들어간다.
각 페이지의 크기에 맞게 배열을 적당한 크기로 자르고, map으로 데이터 테이블을 구현한다.
이렇게 하면, 굳이 데이터베이스를 들여다보지 않고도, 채점 기록을 모두 살펴볼 수 있고,
향후 파일로 정리하기도 편하다!
🔥 TroubleShooting & Review
Issue:
- 리뷰하면서 계속 느낀건데,
SectionClassForInst컴포넌트에서props로 데이터를 넘겨줄 필요가 있을까?
SectionTable에서 받은 토큰을 기반으로 데이터를 GET 요청해 받으면, 인터페이스를 이쪽에서 적용할 수 있으므로
TSX로 구성할 수 있을 것 같다. 가능하다면 리팩토링 해봐야겠다.
- 위에서 언급한 것처럼 토큰 리스트를 전부 받아서 확인해보는 것과 백엔드에서 확인해보는 것 중 어떤 것이 좋을지 판단이 필요하다.
Review
- 학번 순으로 정렬 기능까지 넣어보려다가 아직 못했는데, 반드시 필요한 기능일 것 같다. 리팩토링 시 같이 추가해야겠다.
- 반응형 컴포넌트로 구성했는데, 테이블이 정사각형으로 너무 작아지거나 화면을 뚫어버리는 현상을 확인했다. 세밀한 조정이 필요하다.
